Brushes
The Paintbrush (B) is driven by a fully programmable brush engine. A brush is just a stack of settings — size, hardness, spacing, smudge, scattering, color dynamics and so on — and almost every setting can react live to pressure, speed, tilt, direction or randomness. Edit them in the Brush Settings panel and watch the live stroke preview update as you go.
.myb brushes feel at home here.
Credits. The brush engine is a JavaScript + WebGL port of libmypaint © the MyPaint contributors (ISC license). The spectral “pigment” mixing is ported from libmypaint's pigment mode (by Brien Dieterle), based on Scott Burns' RGB→spectrum reflectance method. The bundled brushes are from mypaint-brushes (CC0 / public domain).
Bundled brushes
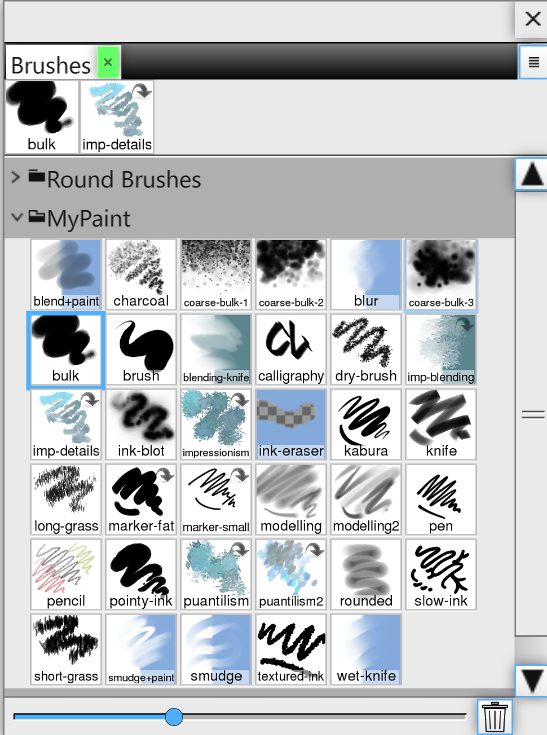
A set of classic MyPaint brushes ships with the app, ready to use — open the
Brushes panel and expand the MyPaint group. You get charcoal, ink,
pencil, knife, smudge, pointillism, grass and more, each with its own thumbnail preview. They live alongside
the built‑in Round Brushes, and you can drop your own .myb files in too.
Brush Engines
Each brush uses one engine — the method it uses to lay paint down. The default is the MyPaint dab engine; the others are specialized natural‑media engines.
The core engine. Stamps a stream of soft “dabs” along the stroke, exactly like MyPaint. Handles hardness, smudge, scattering, color dynamics, pigment mixing and more.
A color‑mixing variant of the dab engine. The brush tip picks up the color underneath and carries it along the stroke (driven by Bleed), for finger‑painting / wet‑blend effects. Enabled automatically when Bleed is used.
Sprays a cloud of particles inside a cone. Build up tone by holding in place; tilt the pen to spray on an angle. Good for soft shading and texture.
Simulates individual bristles with stiffness, clumping and paint depletion — for streaky, dry‑brush and oil‑like marks.
Natural‑media engine that deposits pigment and water into a live fluid simulation for blooms, drying edges and granulation — matte, no impasto. See Natural Media Layers.
Doesn't paint color — it pushes, smears and warps existing pixels, like the Liquify / smudge‑displacement tools in other apps.
Dynamics — making settings react
Most settings show a small curve / “dynamics” control. This is the heart of MyPaint: instead of a fixed value, a setting can be driven by one or more inputs. Map Size to Pressure for pressure‑sensitive strokes, Dab Opacity to Fine Speed for ink‑like tapering, or anything to Random for natural variation.
How a curve is applied
A dynamic setting is a base value plus curves — the curve never replaces the base value:
final = base value + curve1(input1) + curve2(input2) + …
Every input you enable adds its own curve output on top, so several inputs can drive one setting at once and their effects simply sum. That is also why switching an input on changes nothing until you pull a point off the flat line: a curve sitting at zero adds zero.
- The horizontal axis is normalized 0…1 across that input's physical range (the Range column below). For Tilt, the left edge is 0° and the right edge is 90°; for Pressure, an untouched pen and full pressure.
- The vertical axis is an offset in the setting's own units.
+0.2on Dab Opacity means “add 0.2 to whatever the slider says”, not “use 0.2”. - The ends are not clamped. Past the first and last control point the curve keeps going along the slope of that end segment. This is libmypaint's behavior and it is deliberate — the speed inputs routinely run well beyond the right edge of the editor, and a rising curve there keeps rising, which is how MyPaint brushes bloom with speed instead of quietly saturating.
The 18 inputs
Any setting can be driven by any of these. Range is the physical span the curve's 0…1 horizontal axis is
stretched over; the name in code is the id the input has in a .myb file.
| Input | Range | What it measures |
|---|---|---|
Pressure pressure | 0…1 | Pen pressure — 0 = barely touching, 1 = pressed hard. With a mouse there is no live pressure: every dab uses the fixed Brush Pose > Pressure value (1.0 by default), so a pressure curve still fires, pinned at one point. Override Pressure only matters with a pen. |
Fine Speed speed1 | 0…4 | How fast the cursor is moving, lightly smoothed — it follows the pen almost immediately. |
Gross Speed speed2 | 0…4 | The same measurement, heavily smoothed — the pace of the last second of stroke rather than of this instant. |
Random random | 0…1 | A fresh random number for every dab. |
Stroke stroke | 0…1 | How far into the stroke you are. Ramps 0→1 over Stroke Duration, holds, then resets. |
Direction direction | 0…180° | Heading of the stroke folded onto a half turn, so dragging left and right read the same. Right for a nib or chisel. |
Direction 360 direction_angle | 0…360° | Heading over a full turn, so left and right differ. Right for anything with a “forward”. |
Tilt tilt_declination | 0…90° | How upright the pen is held: 0° = laid flat on the tablet, 90° = straight up. With no tilt data (a mouse) it reads 90°. |
Tilt Direction tilt_ascension | −180…180° | Which way the lean points — the compass bearing of the tilt. |
Tilt X tilt_declinationx | −90…90° | The lean projected onto the horizontal axis, signed. |
Tilt Y tilt_declinationy | −90…90° | The lean projected onto the vertical axis, signed. |
Custom custom | −2…2 | A value the brush computes for itself from the other inputs and then smooths over time — libmypaint's escape hatch. It is fed by the brush's own custom_input / custom_input_slowness settings, which have no row in the settings panel, so it only carries a signal on brushes imported from .myb files. |
Zoom Level viewzoom | −1…4 | The canvas zoom, logarithmic — lets a brush compensate for how far in you are looking. |
Grid X gridmap_x | 0…256 | Intended as the cursor's X position on a 256‑pixel grid tiled over the canvas, for texture that depends on where you paint rather than how. Not implemented yet — the value is always 0, so a curve on it is evaluated at its left edge and adds the same constant everywhere. |
Grid Y gridmap_y | 0…256 | The Y half of the same pair. Not implemented yet — always 0, exactly as Grid X. |
Attack Angle attack_angle | −180…180° | Angle between the pen's tilt direction and the stroke direction — how much you are dragging against the lean. |
Base Radius brush_radius | −2…6 | The brush's own base radius, logarithmic — lets one preset behave differently at small and large sizes. |
Barrel Rotation barrel_rotation | 0…360° | Rotation of an art‑pen barrel around its own axis. Not wired to painting yet — the painting path feeds 0, so a curve on it evaluates at a constant; only the brush‑outline preview follows live pen twist. |
Speed is filtered, then gamma‑mapped
The two speed inputs never see your raw cursor speed. Each runs through its own low‑pass filter and then a logarithmic mapping, and both stages are settings you can change (Tracking & Input Filtering, below).
- Slowness is the filter's time constant in seconds. Fine Speed Slowness defaults to
0.04 s, so
speed1reacts within a dab or two; Gross Speed Slowness defaults to 0.8 s, sospeed2reports the overall pace of the stroke. One measurement, two memories: drive the twitchy things (dab opacity, jitter) from Fine and the slow ones (size, smudge) from Gross. - Gamma decides how the speed range is spread across the curve's horizontal axis. Speed is compressed logarithmically before it reaches the curve; a low gamma makes the input very sensitive at a crawl and compress hard once you get going, a high gamma flattens that into a more even response. The setting is itself logarithmic — the engine uses egamma — which is why the useful range is about −8 to 8 and why small changes near the default of 4 are already large.
- Speed is measured in screen pixels per second, so the same hand movement reads as faster when you are zoomed in, and a speed‑driven brush changes character with zoom. That is libmypaint's behavior, kept deliberately.
- Before the first movement sample the filters hold nothing and both inputs read 0 — the left edge of the curve editor. Whatever you drew at the left edge is literally what a dab at rest gets.
Emergent behavior — what no single setting explains
The brush behavior people ask about most is usually not one setting at all: it falls out of the way spacing, speed and dab stacking combine while a stroke is drawn. A tooltip cannot carry any of this, so it lives here.
“Why does the stroke go lighter when I move fast?”
Dabs are scheduled two ways at once, and the engine adds them together. The distance component (Spacing, or Dabs / Base Radius and Dabs / Actual Radius in the MyPaint spacing model) places dabs every so many pixels travelled — that part is speed‑independent, and a purely distance‑spaced brush lays down exactly the same trail whether you crawl or dash. The time component, Dabs / Second, fires on the clock instead. Over one stroke segment:
dabs = distance ÷ spacing + elapsed time × Dabs/Second, and the gap between dabs is
distance ÷ dabs.
Move faster and the same clock‑driven dabs are smeared over more canvas, so the gap grows and coverage thins. That is the whole mechanism — airbrush‑like presets with a high Dabs / Second show it strongly, a distance‑only preset not at all. If your brush thins with speed and Dabs / Second is zero, the cause is a curve instead: look for a Fine Speed or Gross Speed input on Dab Opacity, Dab Opacity Multiply or Size before blaming spacing.
Dab stacking, and why a dense brush prints too dark
Overlapping dabs accumulate: n dabs of alpha a stack to 1 − (1 − a)^n. So halving
the spacing does not only make a line smoother, it makes it darker — the same Dab Opacity now covers each
pixel several times over. Dab Opacity Linearize is the compensation: it divides the requested
opacity across the dabs that will overlap at a point, so the finished stroke reaches the coverage the slider asked
for rather than the coverage the stacking produced. At 0 it does nothing (raw libmypaint stacking); at 1 it
compensates fully. Reach for it when a dense or fur‑like brush prints much darker than its Dab Opacity suggests.
Use Opacity Layer (under Overall Stroke) is the other answer to the same problem from the far end: the stroke is drawn into its own buffer first, so dabs within one stroke never build up on each other at all, and only the finished stroke composites onto the layer.
The Dab Opacity Multiply convention
Dab Opacity and Dab Opacity Multiply are multiplied together before anything else happens, so
mathematically it makes no difference which one you drive. By convention — and this is what every bundled and
imported MyPaint preset does — Pressure goes on Dab Opacity Multiply, leaving Dab Opacity as the
one plain number that says how opaque the brush is meant to be. Keeping to it matters in practice: put your
pressure curve on Dab Opacity instead and load a .myb that already has one on the multiply slot, and
the two curves multiply — pressure squared, and a brush that seems to have gone strangely shy.
Brush Settings
The Brush Settings panel groups settings into the categories below.
Brush Tip — the shape of one dab
| Setting | What it does |
|---|---|
| Size | Brush radius in pixels. The single most‑used setting; map it to Pressure for tapering strokes. |
| Size Jitter | Randomly varies the radius of each dab for a more organic edge. |
| Hardness | How sharp the dab edge is. High = crisp circle, low = soft fade. Zero draws nothing. |
| Dab Profile | The falloff curve from center to edge: Linear, Parabolic, Gaussian or Soft. |
| Roundness | Squashes the dab into an ellipse (1.0 = perfectly round). Great for calligraphy. |
| Angle | Rotation of an elliptical dab. Combine with Roundness for chisel/nib effects. |
| Flip X / Flip Y | Mirror a bitmap/sampled tip horizontally or vertically. |
| Tilt Mode | How pen tilt foreshortens the dab: None, Affine (Photoshop‑style) or Projected (Painter‑style perspective). |
| Filtering | Texture sampling quality for bitmap tips. |
Dab Opacity — coverage & erasing
| Setting | What it does |
|---|---|
| Mixer Model | Default or MyPaint. “MyPaint” matches libmypaint's exact dab‑on‑dab opacity build‑up; “Default” is a simpler blend. |
| Dab Opacity | Opacity of a single dab (alpha). 0 = invisible, 1 = fully opaque. |
| Dab Opacity Multiply | A second opacity factor — conventionally where you map Pressure so paint stops at zero pressure. |
| Dab Opacity Linearize | Corrects the non‑linear build‑up of overlapping dabs so pressure feels natural. |
| Eraser | How much the brush erases instead of paints. 0 = paint, 1 = full eraser, 0.5 = fades toward transparent. |
| Lock Alpha | Paint only where paint already exists — never changes the layer's transparency. 1.0 fully locks alpha. |
Dabs / Spacing — how dabs are spaced
| Setting | What it does |
|---|---|
| Spacing | Gap between dabs as a percentage of the tip. Small = smooth solid line, large = a dotted trail. |
| Spacing Model | Percentage (classic) or MyPaint (dabs‑per‑radius). |
| Dabs / Base Radius | How many dabs to place over a distance of one brush radius (uses the base radius). |
| Dabs / Actual Radius | Same, but using the live radius, so density holds as the brush grows/shrinks. |
| Dabs / Second | Dabs per second regardless of movement — keeps depositing while the pen is held still. |
Dab Placement & Scattering — moving dabs around
| Setting | What it does |
|---|---|
| Shift X / Shift Y | Nudge dabs sideways/up‑down from the stroke. |
| Orbit / Orbit Angle | Offset dabs to one side following the stroke direction (and the angle of that offset). |
| Zigzag | Like Orbit but throws dabs to both sides — good for ribbon/zig‑zag marks. |
| Position Jitter | Random offset per dab. 1.0 ≈ one brush radius of scatter. |
| Speed Spread / Speed Smoothing | Shift dabs based on how fast you move (and how smoothly that decays when you stop). |
| Offset Scale | Master multiplier for all the offset settings above. |
| Scatter Count / Distance / Both Axes | Scatter several dabs around each stamp position — count, spread distance, and whether to spread on one or both axes. |
Smudge — picking up color from the canvas
Smudge makes the brush paint with color lifted from the canvas underneath instead of (or blended with) the brush color — like dragging a finger through wet paint.
| Setting | What it does |
|---|---|
| Smudge | How much to paint with the picked‑up color. 0 = brush color only, 0.5 = half‑and‑half, 1 = pure smudge. |
| Smudge Length | How slowly the carried color updates to the canvas underneath. 0 = re‑sample constantly, 1 = never change (carry forever). |
| Smudge Length Mult. | Logarithmic boost to Smudge Length — lets big, dab‑dense brushes smear further and run faster. |
| Smudge Radius Log | Size of the area sampled for pickup, relative to the brush. 0 = brush radius, +0.7 = double, −0.7 = half. |
| Smudge Transparency | How much transparency the smudge picks up (like a soft lock‑alpha). 1.0 won't move any transparency; negatives reverse it. |
| Smudge Bucket | One of 256 color “memories” to smear from — vary it (e.g. by a custom input) for richer, less uniform blends. |
| Bleed | Mixer‑engine pickup: how strongly the tip soaks up the canvas color and carries it. |
| Resat | How strongly the original brush color is fed back into the tip as you paint. |
| Blurring | Softens the carried tip color over distance, for smoother smears. |
Color — hue/value shifts, pigment & blend modes
| Setting | What it does |
|---|---|
| Dab Blend Mode | How each dab combines with the canvas: Normal, Pigment (subtractive, real‑paint spectral mixing — yellow+blue = green), Multiply, Screen, Add, Overlay, Hard Light, Soft Light. |
| Blend Mix | Strength of the chosen blend mode / pigment effect (0 = normal, 1 = full). |
| Change color hue | Shifts the painted hue around the color wheel as you stroke. |
| Change color value (HSV) | Brightens/darkens the painted color. Map to Random for natural variation. |
| Change color satur. (HSV/HSL) | More/less saturated, in the HSV or HSL color model. |
| Change color lightness (HSL) | Whiter/blacker in the HSL model. |
| Colorize | Recolors the canvas with the brush hue & saturation while keeping its existing brightness. |
| Posterize / Posterize Levels | Crunches colors to a limited number of steps (the levels control sets how many). |
| Restore Color | When a brush is selected, optionally pulls the active color toward the color the brush was saved with. |
| Per Tip | Apply the color change once per dab rather than per stroke. |
Texture — break up the stroke
| Setting | What it does |
|---|---|
| Use Texture | Modulate the stroke with a paper/grain texture. |
| Scale | Size of the texture pattern. |
| Depth / Contrast / Brightness | How strongly the texture bites, and its tonal range. |
| Invert | Flip the texture's light and dark areas. |
| Texture Each Tip | Re‑sample the texture for every dab instead of locking it to the canvas. |
Brush Pose — pen orientation
| Setting | What it does |
|---|---|
| Tilt X / Tilt Y | Live pen tilt — drives tilt‑sensitive dynamics and dab foreshortening. With a mouse there is no live tilt, so the fixed value here is always used. |
| Rotation | Tip rotation, from the pen barrel or a fixed value. |
| Pressure | The live pen pressure. With a mouse there is no live pressure, so the fixed value here is always used (1.0 by default). |
| Override Tilt / Rotation / Pressure | Ignore the pen and use the fixed value above. Pen input only — with a mouse the fixed values are used either way, checked or not. |
Tracking & Input Filtering — smoothing the path
| Setting | What it does |
|---|---|
| Slow Tracking | The brush lags behind the cursor, smoothing out jitter for clean, comic‑style outlines. |
| Slow Tracking Per Dab | The same smoothing measured per dab rather than per unit of time. |
| Tracking Noise | Adds wobble to the path — many tiny random deviations. |
| Pressure Gain | Multiplies tablet pressure, so you press lighter or harder for the same effect. |
| Direction Filter | How quickly the “stroke direction” input reacts (low = snappy, high = smooth). |
| Fine / Gross Speed Slowness | How much the two speed inputs lag behind your real speed. |
| Fine / Gross Speed Gamma | How strongly extreme speeds register on the speed inputs. |
Distance Input & Overall Stroke
| Setting | What it does |
|---|---|
| Stroke Threshold | How much pressure is needed before a stroke counts as “started” (affects the Stroke input). |
| Stroke Duration | How far you must move for the Stroke input to ramp from 0 to 1 (logarithmic). |
| Stroke Hold Time | How long the Stroke input stays at 1.0 before resetting — set very high for “infinite”. |
| Opacity (Overall Stroke) | Opacity of the whole stroke, applied once after all dabs are laid down. |
| Blend Mode (Overall Stroke) | How the finished stroke composites onto the layer (Normal, Multiply, Screen, and the full layer blend‑mode list). |
| Use Opacity Layer | Render the stroke into a temporary buffer first, so overlapping dabs don't darken at the seams. |