Color Management
Color management ensures that the colors you see on screen match what ends up in a printed or exported file, and that images from different sources look consistent when used together. Without it, the same RGB numbers mean different things depending on the display, the printer, or the application that produced the file.
Paintapp supports two complementary color management systems: ICC profiles for traditional profile-based workflows (photography, print, web), and OpenColorIO (OCIO) for scene-linear VFX pipelines. Both run on the GPU — color transforms are executed as WebGL shader operations, not CPU table lookups.
Each system has its own preferences page, because a document uses one or the other, never both: Preferences → ICC Color Management and Preferences → OpenColorIO.
.dcp
camera profile turns raw sensor data into an ordinary picture before ICC
or OCIO ever get involved. See Camera Raw for how the two
connect.

Profile-based color management
Use ICC when your work mostly lives in JPEG, PNG, PSD, print, and standard web or photo workflows.

Pipeline-based color management
Use OCIO when Paintapp is part of a scene-linear ACES or VFX pipeline and needs to match other tools using the same config.
ICC Profiles
An ICC profile (International Color Consortium) is a binary file that precisely describes how a device or color space maps numeric values to physical colors. Every image either embeds a profile or implicitly assumes one. When two images carry different profiles, the same triplet of numbers (say R 200 G 100 B 50) represents a different real-world color.
How Paintapp handles profiles
When you open a JPEG, PNG, PSD, or .icc file that contains an embedded ICC
profile, Paintapp reads the raw binary profile, parses it fully (header, tag table, matrix
and LUT data), and attaches it to the document. The profile is then used immediately for
on-canvas display: the GPU converts from the document's color space to your monitor's sRGB
or Display-P3 output each time the canvas is composited.
Color-managed display is automatic. If a document has an embedded profile you will see it rendered correctly without any extra steps.
Device-Independent Images (CIE XYZ / LogLuv HDR TIFF)
Some HDR TIFFs (SGI LogLuv compression) don't store RGB at all — they store CIE XYZ tristimulus values directly: a device-independent representation with no fixed primaries or white point of its own, wide enough to carry scene-linear HDR data (including values above 1.0, for highlights brighter than white) without clipping.
Paintapp opens these as an ordinary RGB document (the X, Y, Z values sit directly in the R, G, B channels) with a bundled "XYZ Profile" automatically assigned. That profile has no colorants or tone curve to apply — its device space already is the ICC connection space — so it converts to your monitor through the exact same profile pipeline as any other profiled RGB image, no special document mode required. As with any embedded profile, this is automatic: open a LogLuv TIFF and it displays correctly immediately.
Synthesized Profiles
Some formats describe their colors without carrying a profile — OpenEXR and Radiance HDR state their primaries, XYZ-native files say so. Paintapp turns that statement into a profile when the file opens and assigns it, so the document shows correctly and Image → Assign Profile tells you what it is. The name says where it came from:
| Source | Profile name | What it describes |
|---|---|---|
OpenEXR, no chromaticities attribute | sRGB IEC61966-2.1 (Linear RGB Profile) | Rec.709 primaries and D65 white — the format's defined default, and the same primaries as sRGB — with a linear tone response |
OpenEXR, chromaticities present | OpenEXR Custom | The file's own primaries and white, linear |
| OpenEXR, chromaticities on the CIE axes | XYZ Profile | The pixels are CIE XYZ, not RGB |
| Radiance HDR (RGBE) | Radiance Linear RGB | The PRIMARIES line, or Radiance's standard set (equal-energy white) when absent; linear |
| Radiance HDR (XYZE) | XYZ Profile | The pixels are CIE XYZ |
| LogLuv / XYZ-native TIFF, camera raw | XYZ Profile | The pixels are CIE XYZ |
These profiles are saved with the document like any other. Exporting to an 8-bit format converts to sRGB and embeds sRGB, since there is no profile file to embed.
Profiles on Float Documents
A 16- or 32-bit float document stays linear whatever profile it is given. Assigning Adobe RGB or ProPhoto changes its colors — the gamut — but not its brightness, and the profile you assign is what gets saved. Assigning the working RGB profile to an OpenEXR looks the same as its default, because both use sRGB primaries.
This holds for the usual RGB working-space profiles. A table-based profile (most printer and CMYK profiles, some v4 perceptual ones) has no separate linear form, so it is applied as-is.
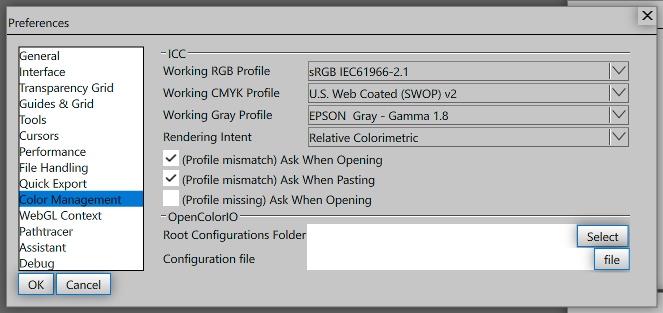
The settings below live in Preferences → ICC Color Management, split into the three sections that page uses: Working Profiles (which profile a new document gets), Conversion Options (how a conversion is performed), and Policies (whether you are interrupted about a profile).
Working Profiles
A working profile (or working space) is the profile Paintapp uses as the default for newly created documents and for files that arrive without an embedded profile. Separate defaults exist for RGB, CMYK, and Grayscale — the preferences page labels the three rows simply RGB, CMYK, and Gray.
| Setting | Default | When to change |
|---|---|---|
| RGB | sRGB IEC61966-2.1 | Use Adobe RGB (1998) for print workflows where you need a wider gamut, or Display P3 for HDR-capable screens and modern web work. Keep sRGB for anything targeting the web or standard screens. |
| CMYK | U.S. Web Coated (SWOP) v2 | Match the specification your print shop provides. Common alternatives are Coated FOGRA39 (European offset) and Japan Color 2001 Coated. |
| Gray | EPSON Gray – Gamma 1.8 | Gray Gamma 2.2 is the most neutral choice for screen-destined grayscale. Use a dot-gain profile when targeting a specific printing press. |
Conversion Options
These three settings decide how a conversion is carried out. Rendering Intent and Black Point Compensation apply directly to color-managed display and to soft proofing (including Gamut Warning); all three also seed the corresponding controls in Image → Convert to Profile, which you can still override per conversion.
Rendering Intent
When a color in the source space falls outside what the destination profile can represent, the rendering intent decides how to handle it.
| Intent | Behavior | Best for |
|---|---|---|
| Perceptual | Compresses the whole gamut to fit; all spatial relationships are preserved but in-gamut values shift slightly. | Photographs with many saturated colors. |
| Relative Colorimetric (default) | Clips out-of-gamut values to the nearest in-gamut equivalent; in-gamut colors are unchanged apart from white-point adaptation. | Logos, graphics, and images where in-gamut accuracy matters most. |
| Saturation | Maximizes vividness over hue accuracy. | Business charts and infographics; rarely used for photos. |
| Absolute Colorimetric | Like Relative Colorimetric but without white-point adaptation — simulates how the source looks on its native substrate. | Soft-proofing; previewing how ink will look on a specific paper. |
Use Black Point Compensation
On by default. Maps the source profile's darkest black onto the destination's darkest black, so shadows are rescaled into the destination's dynamic range instead of being clipped to a flat block. It matters most when the destination cannot reach a deep black — press paper, say, whose darkest ink is around L* 15–20. Turn it off to see exactly where shadow detail would clip.
Use Dither (8-bit/channel images)
On by default. Applies an ordered dither to conversion results before they are quantized back to 8 bits per channel, trading a small amount of grain for the removal of banding in smooth gradients. It has no effect at higher bit depths, where there is enough precision that banding does not arise, and none on display — it is a property of a real conversion, such as Convert to Profile.
Policies
Policies decide when Paintapp interrupts you about a profile — they never change how a conversion is performed. Three checkboxes:
- (Profile mismatch) Ask When Opening (on by default) — fires when the embedded profile in an opened file differs from the working profile. You can convert the pixels to the working profile, keep the embedded profile as-is, or discard the profile entirely.
- (Profile mismatch) Ask When Pasting (on by default) — fires when pasted pixel data carries a different profile than the target document.
- (Profile missing) Ask When Opening (off by default) — fires when a file has no embedded profile at all. You can tag it with the working profile or leave it unmanaged.
With a checkbox off, Paintapp silently applies the safe default (keep the embedded profile on mismatch; assign the working profile when missing) without prompting.
Soft Proofing
Soft proofing answers the question "what will this image look like on a different output device?" — using the monitor you have. The destination can be any device with a profile: a printing press, a plain sRGB screen when you are editing on a wide-gamut display, or a grayscale output. Print is the classic case because the mismatch is most dramatic — a press reproduces far fewer colors than a monitor, so bright saturated blues, vivid reds, and deep blacks all get compressed or clipped when an RGB image is converted to ink. Soft proofing simulates the conversion on screen, so surprises show up while you can still fix them.
The three commands live in the View menu and are per window — two views of the same document can proof differently (for example, one normal view and one proofed view side by side).
View → Proof Setup
Chooses what device to simulate. Selecting any setup also turns Proof Colors on.
| Setup | What it simulates |
|---|---|
| Working CMYK (default) | Conversion to your Working CMYK profile (Preferences → ICC Color Management), e.g. U.S. Web Coated (SWOP) v2. This is the everyday "how will it print" proof. |
| Working Gray | Conversion to the Working Gray profile — a grayscale print preview. |
| Internet Standard RGB (sRGB) | How a wide-gamut document will look on a plain sRGB screen. Useful when editing in Adobe RGB or Display P3 but publishing to the web. |
| Working Cyan / Magenta / Yellow / Black Plate | One ink plate of the CMYK conversion, shown as coverage grayscale (white = no ink, black = full ink) — like inspecting a single channel of the converted result before committing to the conversion. |
| Working CMY Plates | The composite with the black plate removed — shows how much of the image's density comes from the K ink versus the colored inks. |
View → Proof Colors
Toggles the simulation on and off. While enabled, the canvas is rendered through the chain document → proof profile → monitor instead of document → monitor: every pixel is converted to the proof device's color space and back, so colors collapse to what that device can actually reproduce.
The proof conversion honors the Rendering Intent and Black Point Compensation settings from Preferences → ICC Color Management (the same settings used by Convert to Profile).

View → Gamut Warning
Overlays gray on every pixel whose color is outside the gamut of the proof device — colors that cannot survive the conversion and will be clipped to something else. Typical out-of-gamut areas in photos are saturated team-jersey reds, neon signage, and bright sky blues.
Gamut Warning works with Proof Colors on or off: with it off you see the original colors plus the overlay, which makes the flagged regions easier to judge. The overlay color is configurable in Preferences → Transparency & Gamut. Out-of-gamut is determined by the proof profile's built-in gamut table when the profile provides one (the exact boundary test); profiles without one fall back to measuring the perceptual difference (ΔE) of a roundtrip through the proof profile, which can flag a few extra pixels near the gamut boundary.

Screen Gamut
Paintapp can target the actual gamut of your display when compositing to screen. The setting is in Preferences → Interface under Screen Gamut:
- Auto (default) — detects at startup whether your browser reports a P3-capable display and picks Display-P3 or sRGB accordingly.
- sRGB — forces standard gamut output regardless of the display.
- Display P3 (Wide gamut) — outputs the wider P3 primaries. Colors that fall between sRGB and P3 are rendered more vividly on capable screens; they clip to sRGB on standard ones.
OpenColorIO (OCIO)
OpenColorIO is the open-source color management framework used across professional VFX and animation tools — Nuke, Blender, DaVinci Resolve, Houdini, Arnold, and others. Instead of per-device ICC profiles, OCIO uses a single config file that defines every color space in a production: scene-linear renders, log-encoded footage, display transforms, and looks, all as a connected graph.
OCIO is most useful when Paintapp is part of a larger pipeline where assets move between applications. A shared config ensures that a texture authored in Paintapp is interpreted identically in the renderer and the compositor.
In Paintapp, OCIO-managed documents are RGB-only. If you need CMYK, Lab, or Grayscale document workflows, use ICC-based color management instead.
Bundled ACES configs
Paintapp ships with two bundled OCIO configs from the official OpenColorIO Configuration for ACES project, so you can try OCIO immediately without downloading anything else. ACES stands for Academy Color Encoding System: a scene-linear color and interchange standard widely used in film, animation, and VFX pipelines.
| Bundled file | What it is for | Pick it when |
|---|---|---|
CG Config
cg-config-v2.2.0_aces-v1.3_ocio-v2.4.ocio
|
The lean ACES config. Its own header describes it as a minimalistic config aimed at computer graphics artists. It keeps the core ACES working spaces and common displays, but leaves out camera input spaces and less common displays and looks. | Texture painting, lookdev, matte work, and general CG asset creation where you want a shorter, easier list of choices. |
Studio Config
studio-config-v2.2.0_aces-v1.3_ocio-v2.4.ocio
|
The broader ACES config. Its header describes it as geared toward studios that need a wide variety of camera colorspaces, displays, and looks. It adds more review targets, more SDR and HDR variants, and the camera-facing inputs that bigger pipelines depend on. | Matching a studio pipeline, ingesting footage or plates from many camera encodings, or reviewing work across more cinema and HDR output variants. |
Both bundled configs share the same core ACES working roles: scene_linear is
ACEScg, color_timing and compositing_log are
ACEScct, and texture_paint uses sRGB-encoded Rec.709. The practical
choice is simple: start with CG Config for most ACES-based CG work, and use
Studio Config when you need the extra camera input spaces or the broader set
of SDR, HDR, and cinema review transforms.
What is implemented
Paintapp includes a native JavaScript OCIO engine that parses and executes OCIO v1 and v2 config files directly in the browser — no server or plugin required.
- Full OCIO YAML config parsing including
ColorSpace,ViewTransform,NamedTransform, roles, aliases, families, categories, active displays and views. - Transform types:
MatrixTransform(with full inverse),GroupTransform,FileTransform(1D/3D LUT —.cube,.spi1d,.spi3d),CDLTransform(slope / offset / power / saturation),AllocationTransform,LogTransform. - Scene-to-scene color space chaining through the reference interchange space.
- Config can be loaded from a local file at startup or changed at any time in preferences.
The display chain (scene-linear → display-referred via a view transform) is partially complete; the v2 display path is under active development.
Setting up a config
- Start with one of Paintapp's bundled ACES configs if you want OCIO immediately. Bring your own OCIO v2 config only when you need to match another application, a show LUT package, or a studio-authored pipeline.
-
Put your
.ociofile in theuser/presets/ociofolder and it is offered in the Configuration list alongside the builtins — the same way a brush preset is picked up. Alternatively choose Custom… in that list to point at a config anywhere you have granted access to. -
A config that references LUT files needs those reachable too. OCIO resolves a
search_pathrelative to the config file's own folder, so keep the.ociofile and its LUT folder together. - Click OK. The config loads immediately — no restart required.
ICC vs OCIO — which to use
| ICC | OpenColorIO | |
|---|---|---|
| Primary use case | Photography, print, web — device-to-device color matching | VFX, animation, game art — pipeline-wide consistency |
| Config complexity | A handful of per-device profile files | One config covering all color spaces in a production |
| Working color space | Perceptual/gamma-encoded (sRGB, Adobe RGB, …) | Scene-linear (ACEScg, Linear sRGB, …) |
| Document modes in Paintapp | RGB, CMYK, Lab, and Grayscale | RGB only |
| File format interop | Universal — JPEG, PNG, PSD all embed ICC profiles | Pipeline-specific; requires all tools to share the same config |
If you are not working inside a VFX pipeline, leave the OCIO fields empty and rely on the ICC working spaces.